
Game time 🙂
I often play at FM16 and i lost so much time looking for the best technical staff (4/5 stars)
Recently I found somewhere nice formulas to calculate, using the parameters, the number of “stars” and therefore, quality of coaching.
Since I did not want to calculate by hand and even with the calculator i created an excel file to calculate all conveniently.
Then, in the game you can choose coach to check, and insert its parameters in the file; in this way you will know the number of stars for each category of training, of course you can enter all the parameters or only those that interest you.
 You can download it – there are 2 version, italian and english
FM16 Coach calculator
FM16 coaching “star” calculator
Posted in Giochi
Comments Off on FM16 coaching “star” calculator
Mac os:How to change dns in a click
I needed to use particular dns and would change them quickly (with a click)
here is how i did it:
First, here command for make modification by terminal:
sudo networksetup -setdnsservers <networkservice> DNS1, DNS2, DNS3
How to obtain a list of your network services:
networksetup -listallnetworkservices
you will obtain outcome like below:

In my case i have to change Wi-fi dns, so (as example i’ve used Google dns 8.8.8.8 and 8.8.8.4 ), opening terminal and running the following command , DNS will be changed:
“sudo networksetup -setdnsservers Wi-Fi 8.8.8.8 8.8.8.4”
But how to run it with a click ? using Apple script : open it and insert the following commands :
![]() First row executes the command described above , while second line brings up a message that tells us that the command was executed (clearly is optional) .
First row executes the command described above , while second line brings up a message that tells us that the command was executed (clearly is optional) .
After that save as application and work is ended; a click will be enough to change your dns
![]() Here is the result after clicking (you will be prompted for the root password )
Here is the result after clicking (you will be prompted for the root password )

Looking Dns section we can see that they have been modified

Posted in Mac Os
Comments Off on Mac os:How to change dns in a click
How to insert xdcc commands in Kvirc menu
I always used Mirc and its countless scripting functions for more than 10 years; this time I wanted to try Kvirc scripting functions.
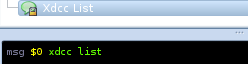
Idea is to create an handy menu on Kvirc in order to execute commands xdcc send # ( command used to download data) and xdcc list (command for obtain list from bots) from a menu, instead of writing it in chat – here’s how:
In Kvirc menu, select “Scripting” – “Edit Popups” (CTRL+Shift+P)

Since our command, will run in a channel, select “Channel” from the popup menu
![]()
Now click with the right mouse button within the channel menu and choose where you want to place the new element; for example, I chose to put it as last, so I selected the last entry and I clicked “new item below”, which I called XdccSend – you can also enter a number in the entry icon to get an icon (optional)

Finally I set menu dialog (variables are more complicated than on Mirc) for Xdcc send

and for Xdcc List (much more easy)

The result: when you join in a channel and click with the right button the bot from which you want to receive file, new entries will appear:

If you click XdccSend will be asked to enter package number, so insert number and wait for your package.

While if you click Xdcc List (after selecting your bot) will show you the xdcc list of packages contained in bot (if bot is enabled for it)
![]()
If you are not a newbie in IRC world , don’t need more info 🙂
Posted in Gnu-Linux, Mac Os, Tech news - tutorials, Windows
10 Comments
Systemd Installation on Debian Wheezy
I wanted to try the “infamous” systemd on my Debian Wheezy: Let’s start with a refresh (being root)
apt-get update && apt-get upgrade
After that we can install systemd – initially I’ve used version present in repository Wheezy/stable (44-11 + deb7u4)
apt-get install systemd systemd-sysv
 After writing the funny sentence, installation is completed.
Now, we have to edit the grub to make sure that systemd will start without any problems:
nano /etc/default/grub
At the last row I added, (under the GRUB_CMDLINE_LINUX_DEFAULT section):
init=/bin/systemd
Then i have updated grub:
sudo update-grub2
After reboot, Systemd is perfectly working.
At that point I wanted to try also the latest systemd version present in backports repository (204-14 ~ bpo70 +1); so i’ve enabled backports repository
nano /etc/apt/sources.list
adding wheezy-backports repository in sources.list:
deb http://ftp.debian.org/debian/ wheezy-backports main contrib non-free
After saving, type:
apt-get update
finally we can install systemd backports repository version(204-14~bpo70+1):
apt-get install -t wheezy-backports systemd systemd-sysv
After reboot will have systemd working; considerations: the system reboot seems to be, in my case, slightly faster.
Below some useful commands operating in Systemd:
systemctl
Show all active services
systemd-analyze
Prints the time spent in the kernel before userspace has been reached, the time spent in the initial RAM disk (initrd) before normal system userspace has been reached, and the time normal system userspace took to initialize. Note that these measurements simply measure the time passed up to the point where all system services have been spawned, but not necessarily until they fully finished initialization.
![]() systemd-analyze blame
systemd-analyze blame
a list of all units running, sorted according to the time you have used the services. This information can be used to optimize startup times, for example we can disable startup of a service (systemctl disable foo service) that maybe we don’t need and that takes a long time to start.
Note that the result could be misleading; for example, the start time of a service might be slow simply because it waits for initialization of another service is complete.

systemctl start foo.service
activate a service immediately (replace foo service with a real service)
systemctl stop foo.service
Disable a service immediately
systemctl restart foo.service
Restart a service
systemctl status foo.service
Check status of a service
systemctl enable foo.service
Enable a service to startup on boot
systemctl disable foo.service
Disable a service at boot
systemctl is-enabled foo.service; echo $?
Check whether a particular service or less at startup
Posted in Gnu-Linux
Comments Off on Systemd Installation on Debian Wheezy
How to save a list of installed packages (Debian)
May happen to have to re-install Debian (and derivates) in another pc/server
Certainly, if new machine has a similar hardware i could clone hard disk; but more often the other machine has a different hardware…
So it is useful to save a list of installed packages; to have them immediately available during reinstallation in another (or in same) machine avoiding to remember all packages one by one 🙂
As first thing is useful to make a copy of /etc/apt/sources.list or annotate repository are you using (wheezy, backports, etc) somewhere.
Open terminal (being root) and type:
dpkg –get-selections > /home/$USER/pacchetti.txt
![]()
At this way was created a file named “pacchetti.txt” in my /home directory;
now you can save your file somewhere; for example, in an external usb drive,so you can use it when you’ll need.
How to restore packages:
Place file pacchetti.txt in your /home , then select packages in your file by typing:
sudo dpkg –set-selections < /home/$USER/pacchetti.txt
and install selected packages by typing :
sudo apt-get dselect-upgrade
 Selected packages will be installed (obviously if missing).
Posted in Gnu-Linux
Comments Off on How to save a list of installed packages (Debian)
How to quickly join .mts files whitout losing quality
I needed to join several .mts file exported from my camera, with idea to get a single movie, in order to use it for further editing; important thing is that I wanted to keep the quality-without converting anything.
I’ve found this useful application, Video to Video; it is also portable so don’t need any installation, it is free and multilingual
Here,In short description, how to join .mts files:
Open application and choose tools->Join Video Files ; so push Add button and select files you want to merge

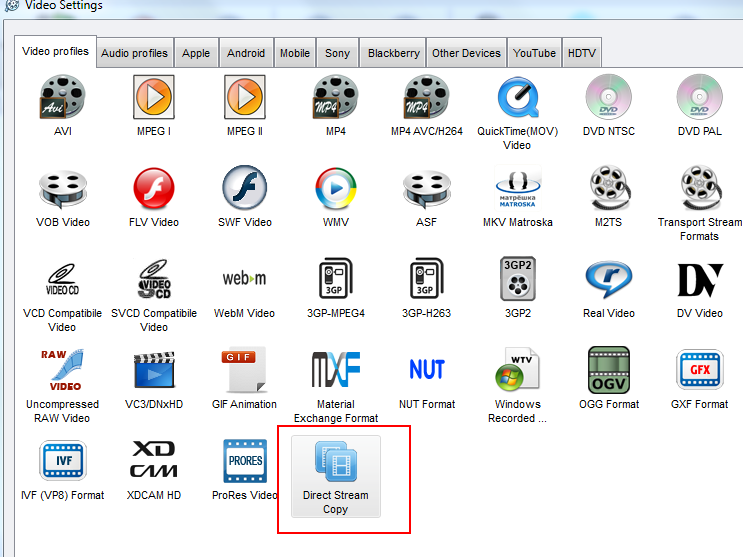
Now, after pressing ok Ok will be asked for the format you want convert; in our case, as already said, we will not do any conversion, so we choose Direct stream copy and OK
As you can see in image below, your files already appearing as a single file, then we need only to push Convert button and wait some second or some minutes (it depend on the size of your file), waiting to see status on 100% in progress column.
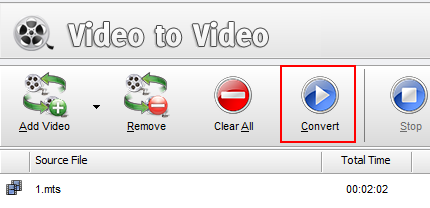

Therefore we obtained an unique .mts file from several files; of course same concept is valid also with any other kind of movie (i mean .avi, mt2s, etc): using Direct stream copy, application simply combine the files without any conversion (of coure you can also use it to convert )
Posted in Tech news - tutorials, Windows
1 Comment
Notepad: a simple text editor …….for mac
When i am using windows, to take notes i was using notepad.exe, I like its simplicity and speed, and I very much appreciate the fact that when you paste something you lose formatting (very useful when for example i have to try to copy-paste any phrase, and I don’t want to waste time with text format). Yes, I know, on Mac Osx there is Textedit; however is more like an editor such as Libreoffice/Ms office than notepad.
So if you need , like me, only a simple text editor (txt) for Mac ,Notepad is right for you.
Click at icon below to download it (free) from App store.

Shutdown check on Mac OsX
Need to know when when your mac was turned off ? use this short and useful command: Go to applications -> utility -> console and write: last | grep shutdown
Will appear log that show when your mac was turned off :
shutdown ~ Tue Aug 5 13:59 shutdown ~ Tue Aug 5 12:34 shutdown ~ Tue Aug 5 12:08 shutdown ~ Tue Aug 5 09:55
Posted in Mac Os
Comments Off on Shutdown check on Mac OsX
Win 8.1: The “return” of start button :)
I updated my win8 on my Desktop computer (NB i am using win only for play:-), to version 8.1;
I had already previously provided to disable that shit named Metro and used Classic Shell to restore the old menu but …
Reading about start button return,coming win 8.1 update, I said “i can try it” then i removed Classic shell, Metro was recovered automatically, and after i’ve update win to 8.1 through “amazing” Windows store. After reboot start button appeared but …. clicking it, you enter in Metro (!!) so which is utility of this start button?????
Therefore despite user requests, Windows Start button is back but with “reduced features”than we usually find on Windows Seven and earlier (in practice there is only a shortcut to enter in metro and nothing else)
Evidently in Redmond haven’t figured out that the request was not to have the windows shortkey, but to have the old windows MENU …
moral of the history,
If you want dear old menu i suggest you to Classic shell, (in my case i have to reinstall it:) a free application allows users to restore the Start Menu in Windows 8.
Installation is easy and you can choose the style of the menu between “classic”, “XP” or “Windows 7” (it will still be able to switch to Metro if you want)
The program also has a user interface where you can apply all appropriate customizations such as disable the obnoxious pop-up menu (the so-called hot corner) that appears when you go with the mouse over the corners of the screen.
There are an infinity of programs performing the same function as Classic shell, such as:
startw8
Start8 (is not gratis but it’s worth a try)
Below an example of menu with classic shell and with start8
Classic Shell menu Start8 menu


If you don’t have a tablet, I highly recommend trying them:)
Zevenos Neptune – i like it
I’ve found this very interesting distro and i immediately installed it:
First consideration: I wanted Debian Debian Debian:-), I to try Wheezy with KDE and I must say that, as usual, there is nothing to say, rock-solid distro for server use; I think it is absolutely unbeatable (obviously should be installed without graphics).
However for Desktop use, I’d rather like to have a kernel a little less dated and capable of recognizing without too much trouble most recent devices and of course a Kde version newest than the 4.84.
I discarded Debian testing version because I have no more desire/time to put me to fiddle around every time will be a kernel update; I haven’t even taken into consideration Sid version (unstable), (then better go directly to Ubuntu and derivatives, but I was not interested about it.)
During my research i’ve found Zevenos Neptune, a Debian-wheezy based 64-bit version of distro Zevenos.
It’s Debian Wheezy but in addition has numerous packages derived from testing version; in practice Zevenos team has recompiled some testing packages for making them compatible for Debian Wheezy version.
So we can find:
kernel: 3.10.5 (with a lot additional drivers)
KDE 4.10.5 (full)
Xorg: 7.7
Libreoffice 4.1
There is also a software Manager named Apper that has nothing to envy to Synaptic (which I installed anyway)and surely it working better than Muon, here it is below along with cute drop-down terminal, Yakuake

There is also an interesting menu

After installing I proceeded to Add Nvidia proprietary drivers for my gt630 (i installed the 304.88 from repository) and afterwards I activated and tested the effects of KDE

If you want a really stable distro Debian based, I recommend you try Zevenos Neptune, you won’t be disapointed:-)
Posted in Gnu-Linux
Comments Off on Zevenos Neptune – i like it


